When designing an application using Azure Cosmos DB, users are required to select a Partition Key from among the properties stored for each item, and the value in the Partition Key is used to scale out their data. Users can avoid costly cross partition queries by correctly using the Partition Key in their queries but in many cases, it can be difficult to have one container be efficient at writing data as well as queries. This can sometimes result in a design that scales well for writing data, but with slow or expensive queries for users.
The solution historically has been to use Change Feed and copy data from one container to another, then use that one for queries. Another solution is to simultaneously write the data to multiple containers. However, these approaches add complexity. This is where the materialized view pattern can help. Materialized Views can easily create and maintain data between two containers, allowing both to work efficiently. This saves time and money.
We’re excited to announce the Public Preview of the Materialized Views feature for Azure Cosmos DB for NoSQL. This new feature lets customers create Materialized View Containers and keep them in sync with the source container by simply provisioning a Materialized View Builder and defining which properties they want to populate in the Materialized View Container along with the choice of the new Partition Key. The Materialized Views feature for Azure Cosmos DB also lets customers monitor if views are getting populated in time and if they need to allocate more compute.
The Azure Cosmos DB Materialized Views feature offers the following benefits:
- Reduction in cross partition queries
- Reduction in RU charges for the existing queries
- Improvement in query execution time
- Zero coding effort
- Easy fine tuning and monitoring of Materialized View Containers
Let’s understand the Materialized View usage with a practical scenario. Consider the below scenario:
- There is a telecom company named Contoso Telecom
- Contoso stores its users’ monthly billing information
- Contoso provides a web portal where a user can enter his/her ID or mobile number and retrieve the billing data. The web portal processes hundreds to thousands of customer requests per second.
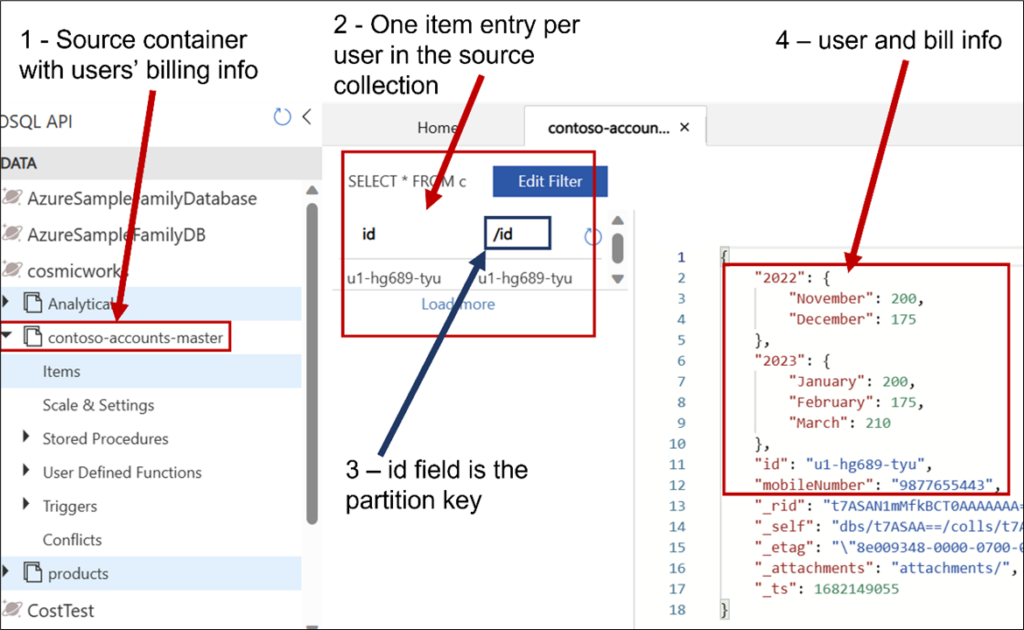
- In the database container, Contoso specifies ID as the Partition Key. Below is a screenshot showing a sample entry as viewed in Azure Cosmos DB Data Explorer.

- When the user specifies the ID in the web portal, the application searches for the item corresponding to the ID. Since the ID is also the Partition Key, the lookup is fast and inexpensive.
- But the users do not always remember the ID, and they might enter a mobile number instead.
- In this case, there will be a scan through the data as the partition key is not known. This will lead to time consuming and expensive cross-partition queries.
Materialized Views can help in this case. If Contoso needs to maintain the source container but it also must handle database operations where a non-partition-key field is frequently used as a filter, Contoso can copy a subset of the data from the source container to a new container and specify this non-partition-key field as the partition key in the new container. Contoso could also write the data to multiple containers simultaneously and ensure that these containers have different subsets of the overall data with different partition keys depending on the business use cases.
Copying the data to a new collection and specifying a new partition key will reduce the cross-partition queries but Contoso will have to implement a custom logic to keep the data in sync between the source and the new collection. On the other hand, writing to multiple containers simultaneously will require the application to ensure that all the writes are acknowledged, and all the containers are in sync. This requires heavy lifting on the application side and might also introduce more waiting time. This is where Materialized Views help by automatically copying data from the source container to the new containers and keeping it up to date with any updates, inserts, and deletes in the source container.
In this example use case, Contoso Telecom can define a Materialized View that has a subset of data containing the mobile number and the billing data fields where the mobile number becomes the partition key. On the portal side, the application can decide to query the base container if the user knows the ID, and if the user specifies the mobile number, the application can query the Materialized View in which the mobile number is the partition key.
Let’s take a look at how we can create a Materialized View in Azure Cosmos DB for NoSQL. To use this preview feature, the following steps are required:
- Enabling the Materialized Views feature at the Azure Cosmos DB Account level from the Features blade in Azure Portal.
- Provisioning one or more instances of the Materialized View Builder at the database account level to handle the compute requirements related to the Materialized Views.
- Defining and creating a Materialized View using REST API and Azure CLI.
Now let’s look at the above three steps in detail.
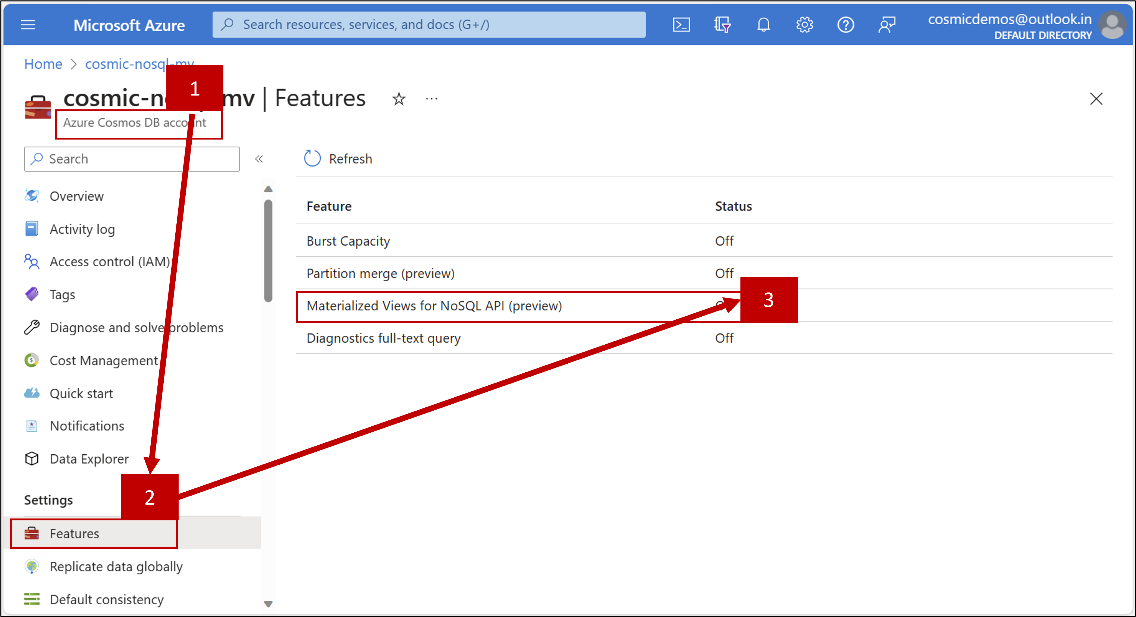
- Enabling Materialized View feature: Currently, the Materialized View feature is in Preview so the feature needs to be enabled for the Azure Cosmos DB account for which it is to be used.
- Go to the desired Azure Cosmos DB account.
- Click on the “Features” sub-menu under the “Settings” section.
- Select the Off/On toggle against the “Materialized Views for NoSQL API” toggle and Click “Enable” in the pop-up.
Refer to the screenshot below for these steps.

- Provisioning Materialized View Builder: Once the registration request gets approved, you can provision Materialized View Builder instances at the database account level for the accounts in which you will create Materialized Views.
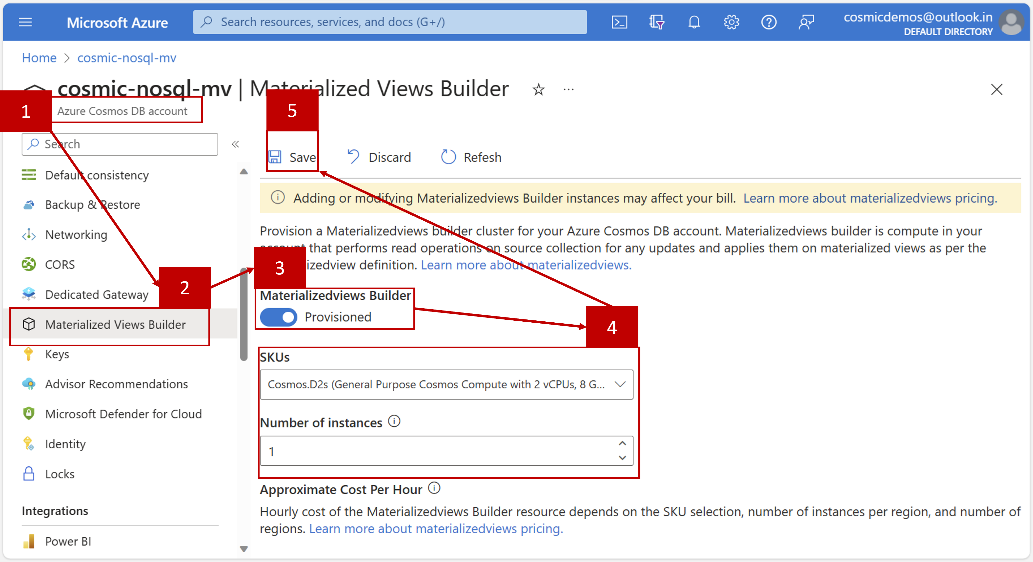
- Go to your database account and find the “Materialized View Builder” option under the Settings menu option.
- Materialized View Builder will be in “Deprovisioned” state, use the toggle button to set it as “Provisioned”.
- Choose an SKU from the SKUs dropdown. You can get started with the lowest available configuration for now.
- Choose the Number of Instances of the selected SKU. You can specify 1 here to begin with.
- Click on “Save”. It’ll take some time to provision the Materialized View Builder instances and you can monitor the deployment progress from the Notification section in the portal.
Refer to the screenshot below for these steps.
- Defining and creating Materialized View using REST API: During the preview, Materialized Views can only be created through REST API. We’ll use the Azure Cosmos DB Management API through Azure CLI to make sure that only authenticated users are able to create the MV containers. The process of creating a Materialized View (MV) container, is similar to the process of creating a normal container in Azure Cosmos DB, except that the container definition for MV has an additional materializedViewDefinition section to specify the source collection and the set of fields that you need in the Materialized View.
- The first step is to create an mv_definition.json file that contains MV container related information. The content of this file must look similar to the json below:
"location": "<specify a write region>", "tags": , "properties": "resource": "id": "<specify the new MV container name>", "partitionKey": "paths": [ "<specify the path of the Partition Key field from the source container>" ], "kind": "Hash" , "materializedViewDefinition": "sourceCollectionId": "<Name of the source collection>", "definition": "<select field1, field2, field3… from ROO>" , "options": "throughput": "<required throughput for MV collection>" - Launch Azure CLI and login using the az login command.
- After successful login, make a REST API call to create MV container using command below after substituting the required values.
az rest --method put --body @mv_definition.json --url https://management.azure.com/subscriptions/<subscription id>/resourceGroups/<resource group name>/providers/Microsoft.DocumentDB/databaseAccounts/<Database Account Name>/sqlDatabases/<database name>/containers/<mv container name as specified in the json under id field>?api-version=2022-11-15-preview --headers content-type = application/json
- Now you can head over to the Azure Portal and see the newly created MV container alongside your other containers in the Data Explorer.
- Try adding, deleting, and updating the items in the source collection and check the items in the newly created Materialized View collection to verify that the changes are propagating correctly and quickly. Also note the Partition Key and the throughput values.
- The first step is to create an mv_definition.json file that contains MV container related information. The content of this file must look similar to the json below:
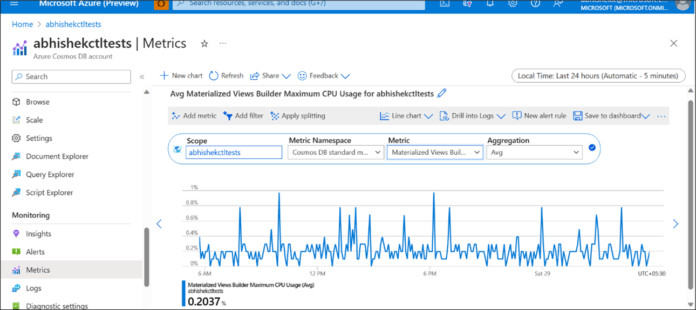
Apart from the cost benefits and coding effort reduction, Materialized Views also offer the ease of fine tuning and monitoring. While using a Materialized View, it is important to know if the data in the view is up to date or not, and if not, then how much it is lagging when compared to the source container. The “Max Catchup Gap in minutes” metric tells about the freshness of the data in the Materialized View containers. If this gap is significant, then metrics like “Materialized Views Builder Average CPU Usage (Max)”, “Materialized Views Builder Average CPU Usage (Avg)”, and “Materialized Views Builder Average Memory Usage (Avg)”, can be used to determine whether the provisioned Materialized View Builder SKUs are sufficient to keep the source and the MVs in sync.
Below are the screenshots showing the different monitoring options as seen in Azure Portal. 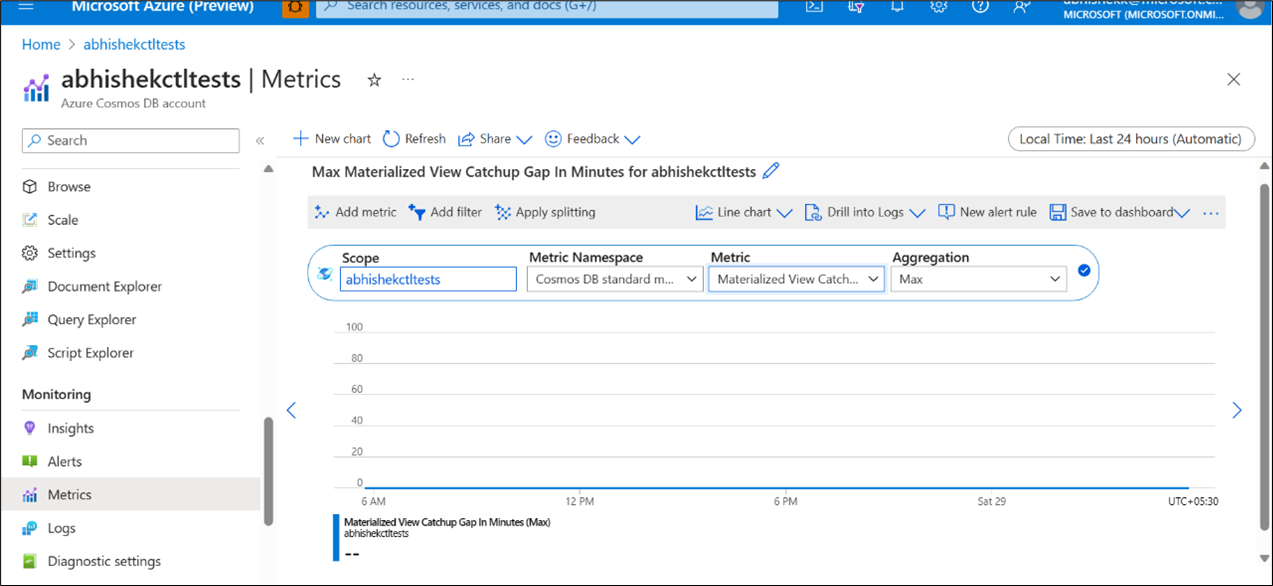
Figure 1: Materialized View Catchup Gap in Minutes
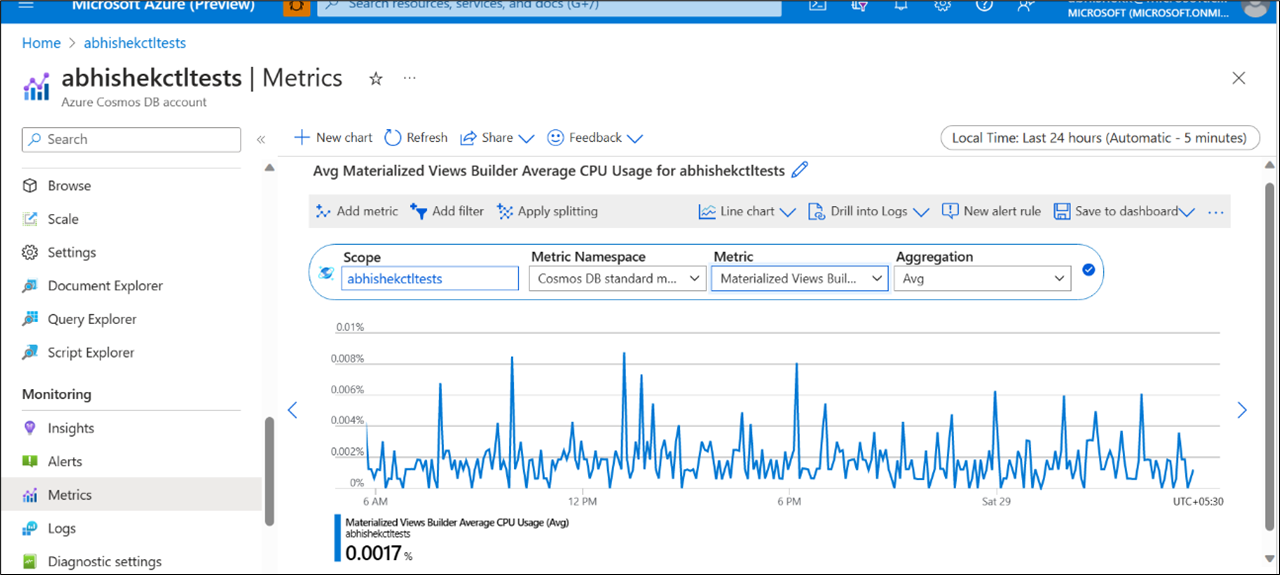
Figure 2: Avg CPU Usage for the provision Materialized View Builders
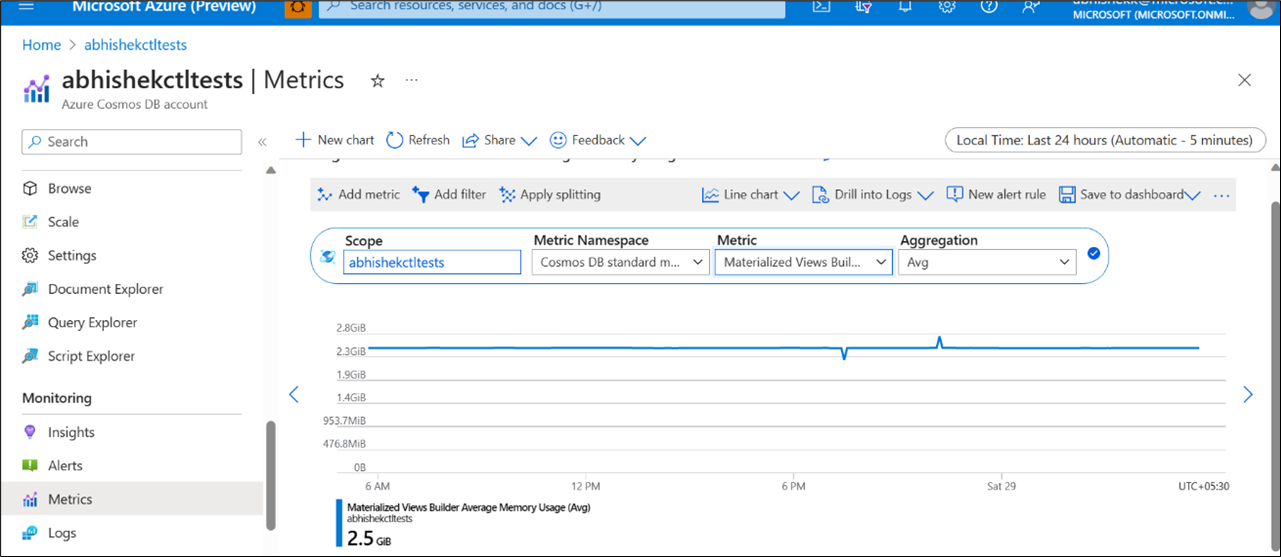
Figure 3: Avg Memory utilization for the provisioned Materialized View Builder
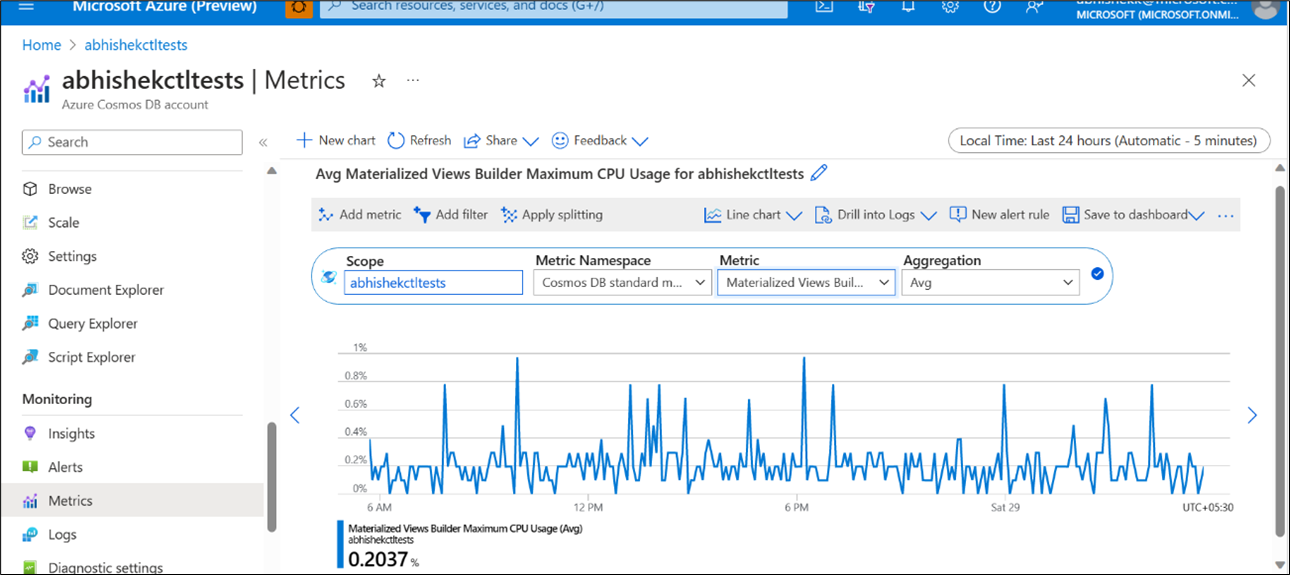
Figure 4: Materialized Views Builder Maximum CPU usage (Avg)
One can use these metrics to regularly monitor if the Materialized Views are getting populated quickly and if the provisioned Materialized View Builders are sufficient to cater to the requirement.
- If the Catchup Gap (figure 1) is high, it might be due to insufficient Materialized View Builder compute or due to a less than required throughput provisioned on the MV container.
- If the MV container shows throttling for the write requests, increasing the throughput might help.
- If the catchup gap is high and there’s no throttling for the write requests on the MV container, then investigating the Materialized View Builder memory and CPU usages will help.
- A close to 100% Avg Memory/CPU utilization indicates the need for provisioning more Materialized View Builder instances or provisioning the SKUs with higher configurations.
Since the Materialized View feature for Azure Comsos DB for NoSQL is still in Preview, there are some limitations that need to be considered before trying it out. As of now, a maximum of 5 Materialized Views can be defined on a source container and a single Materialized View container cannot fetch data from multiple source containers. The Materialized View containers are like normal containers except that the Materialized View containers are read-only for the end-application and don’t accept any writes except for the automatic writes through the Materialized View Builder. Below is an exhaustive list of current limitations:
- Where clause in the materialized view definition is not supported.
- You can project source container items’ Json object property list only in Materialized View definition. At present, the list can be only first level of properties in JSON tree.
- In Materialized View definition, aliases are not supported for properties of items.
- It is recommended that MV is created when the source container is still empty or has very few items. This is a temporary issue and a fix is underway.
- Restoring from backups does not restore Materialized Views. You need to re-create the Materialized Views after the restore process is complete.
- All Materialized Views defined on a specific source container must be deleted before deleting the source container.
- PITR, hierarchical partitioning, and end-to-end encryption features are not supported on source containers on which materialized views are created.
- Role based Access Control is currently not supported.
- Cross-tenant customer-managed-key-based encryption is not supported on Materialized Views.
- Not supported on accounts using Availability Zones.
Try Azure Cosmos DB for free
Azure Cosmos DB is a fully managed NoSQL and relational database for modern app development with SLA-backed speed and availability, automatic and instant scalability, and support for open source PostgreSQL, MongoDB and Apache Cassandra. Try Azure Cosmos DB for free here. To stay in the loop on Azure Cosmos DB updates, follow us on Twitter, YouTube, and LinkedIn.
Anders Wåglund
0
0
Olena Borzenko-Turianska
1
0
Erik O’Leary
1
0
Nitin Rahim
1
0
Nitin Rahim
0
0
Nitin Rahim
0
Post Disclaimer
The information provided in our posts or blogs are for educational and informative purposes only. We do not guarantee the accuracy, completeness or suitability of the information. We do not provide financial or investment advice. Readers should always seek professional advice before making any financial or investment decisions based on the information provided in our content. We will not be held responsible for any losses, damages or consequences that may arise from relying on the information provided in our content.


