


Mark Brown
Today we’re excited to introduce a brand new Azure Cosmos DB Desktop Data Migration Tool. You can find the new tool at https://github.com/AzureCosmosDB/data-migration-desktop-tool. Read more about it below and how to use it.
Some History
The old Data Migration Tool (or DMT as it was known) was originally created in 2015 and had become outdated. It was built on the Microsoft .NET framework 4.5.1, which meant that it was Windows only and also made it difficult to upgrade to modern versions of .NET. It also used the original DocumentDB client for .NET which has since been replaced by the newer Microsoft.Azure.Cosmos client library and uses a completely different architecture. Using the old library meant that as new features have been added to the Azure Cosmos DB platform, and then supported in the new client library, there was no path to add that same support to the migration tool. Besides being somewhat orphaned from any new features in Cosmos DB, the performance of the old DocumentDB libraries was nowhere near as good as they were with the new Cosmos client.
The New Version
A team at Solliance, who were frequent users of the old tool, approached our team and asked if we were ever going to update this old tool. They also indicated that, if we were ok with it, they would be willing to update this tool, designing and building a completely new version from scratch. The tool was already an open project with an open source license
The new tool is built on .NET 6 and designed to be cross platform. Like the old tool, it uses a plugin architecture to make it extensible for adding support for new data stores. The initial release includes a cross-platform console application and the five initial plugin extensions, all of which include both source and sink implementations for exporting or importing data for these database API’s and formats:
- Cosmos DB NoSql
- JSON
- MongoDB
- Azure Table API
- SQL Server
Settings can be provided to the tool in different ways including command line parameters and environment variables but the easiest way to get started is by creating a file named migrationsettings.json. The individual settings used for each extension vary and can be found in documentation for each extension. This example uses the JSON extension as source and Cosmos-NoSql extension as sink.
[migrationsettings.json]

    "Source": "json",
    "Sink": "cosmos-nosql",
    "SourceSettings":
    "FilePath": "my-data.json"
,
"SinkSettings":
    "ConnectionString": "AccountEndpoint=...",
    "Database": "myDb",
    "Container": "myContainer",
    "PartitionKeyPath": "/id",
    "RecreateContainer": true
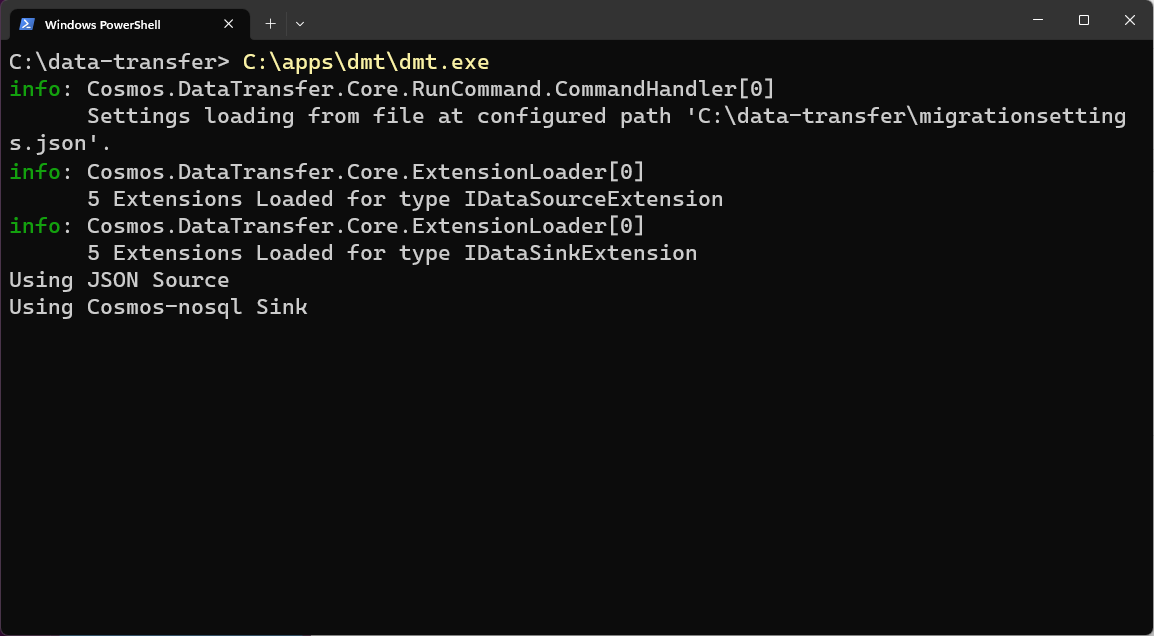
Once the migrationsettings file has been created, all that’s needed is to run dmt.exe from the folder where your file is located. For example, if I install the app in c:appsdmt and save my migrationsettings.json file in c:data-transfer I would run this in PowerShell:
Other Settings
By choosing a different source I also change which settings are available. This example reads data from MongoDB and uses some of the additional options settings for Cosmos-NoSql to change the data transfer behavior and allow updating existing container items:
    "Source": "mongo",
    "Sink": "cosmos-nosql",
    "SourceSettings":
        "ConnectionString": "mongodb://...",
        "DatabaseName": "myDb",
        "Collection": "myCollection"
    ,
"SinkSettings":
    "ConnectionString": "AccountEndpoint=...",
    "Database": "myDb",
    "Container": "myContainer",
    "PartitionKeyPath": "/id",
    "ConnectionMode": "Direct",
    "MaxRetryCount": 10,
    "WriteMode": "Upsert"
I can also use a different file name or place the file elsewhere in my file system and then use the –settings parameter to specify the file’s path: c:appsdmtdmt.exe –settings c:settingsmongo-cosmos-nosql-settings.json
To see all of the available commands and options the app supports look at the in-app help (dmt.exe -h)

Get Started
Thanks to the open-source project and the plugin model we welcome you to add additional data stores that you would like to use with the tool. The steps for creating new plugin extensions can be found in the developer documentation and any additions you make can be contributed back to the main project!
Or visit the GitHub project to find the code and documentation and provide feedback or suggest new features. We’re looking forward to hearing from you!
Natalia Brett
0
0
Paulo Pinto
0
0
Post Disclaimer
The information provided in our posts or blogs are for educational and informative purposes only. We do not guarantee the accuracy, completeness or suitability of the information. We do not provide financial or investment advice. Readers should always seek professional advice before making any financial or investment decisions based on the information provided in our content. We will not be held responsible for any losses, damages or consequences that may arise from relying on the information provided in our content.